


I recently shared a post on Threads about how generous Cloudflare's free tier is for side projects.
This isn't theoretical. I run a production app on this exact stack, handling 27,000+ requests per day with zero errors and an average CPU time of 5.24ms per request, all without paying a single cent.
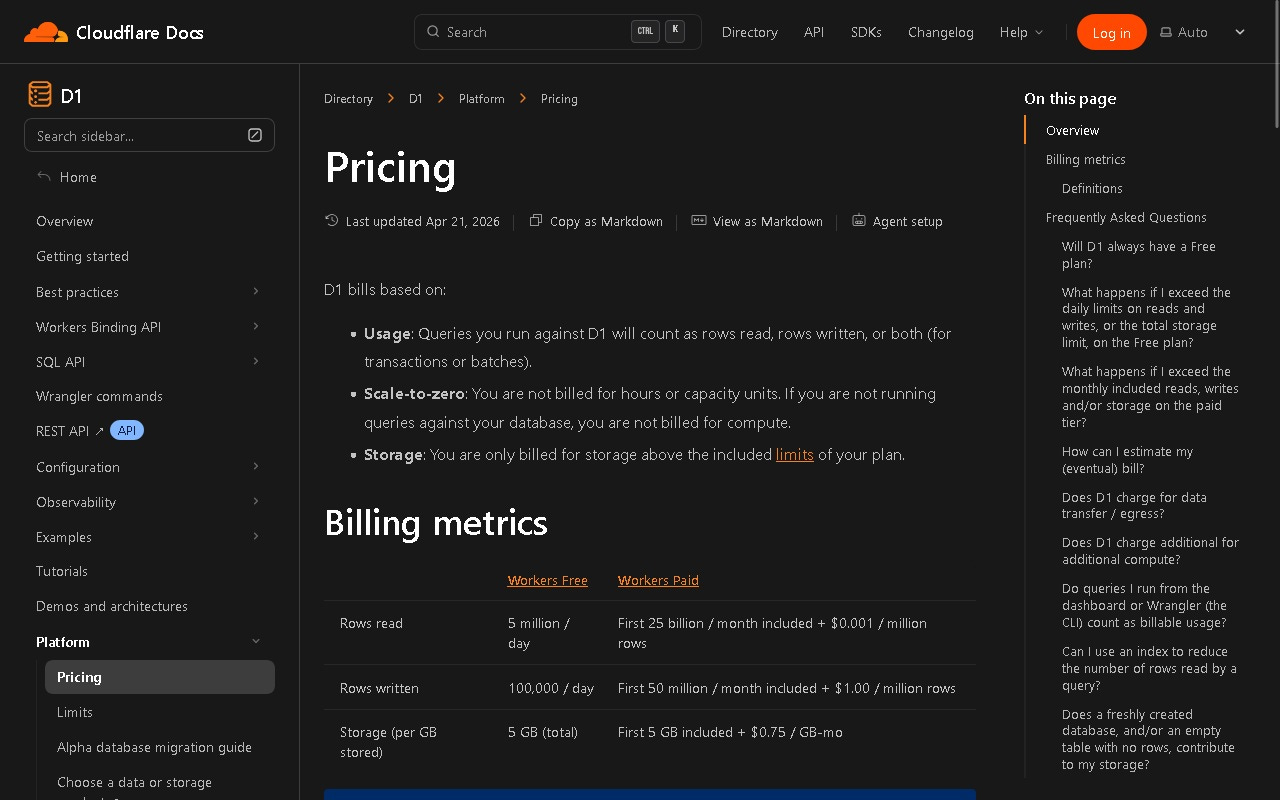
Figure 1: Cloudflare D1's free tier includes 5 GB storage, 5 million reads/day, and 100,000 writes/day.
Why Cloudflare's Free Tier?
Most cloud providers give you a "free trial" that expires after 30 days. Cloudflare's free tier is permanent. No credit card required, no surprise bills. For indie developers and side projects, this is a game changer.
Here's what you get for free:
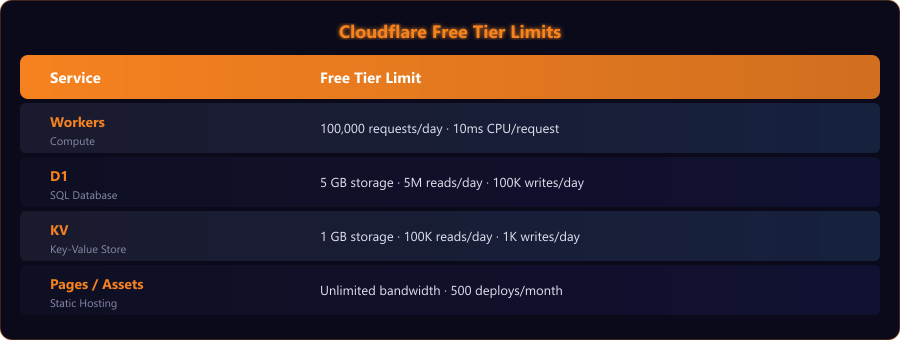
Figure 2: Summary of Cloudflare's permanent free tier limits for Workers, D1 database, KV store, and Pages.
Combined, this gives you a full-stack platform: compute, database, caching, and static hosting, all at the edge, globally distributed.
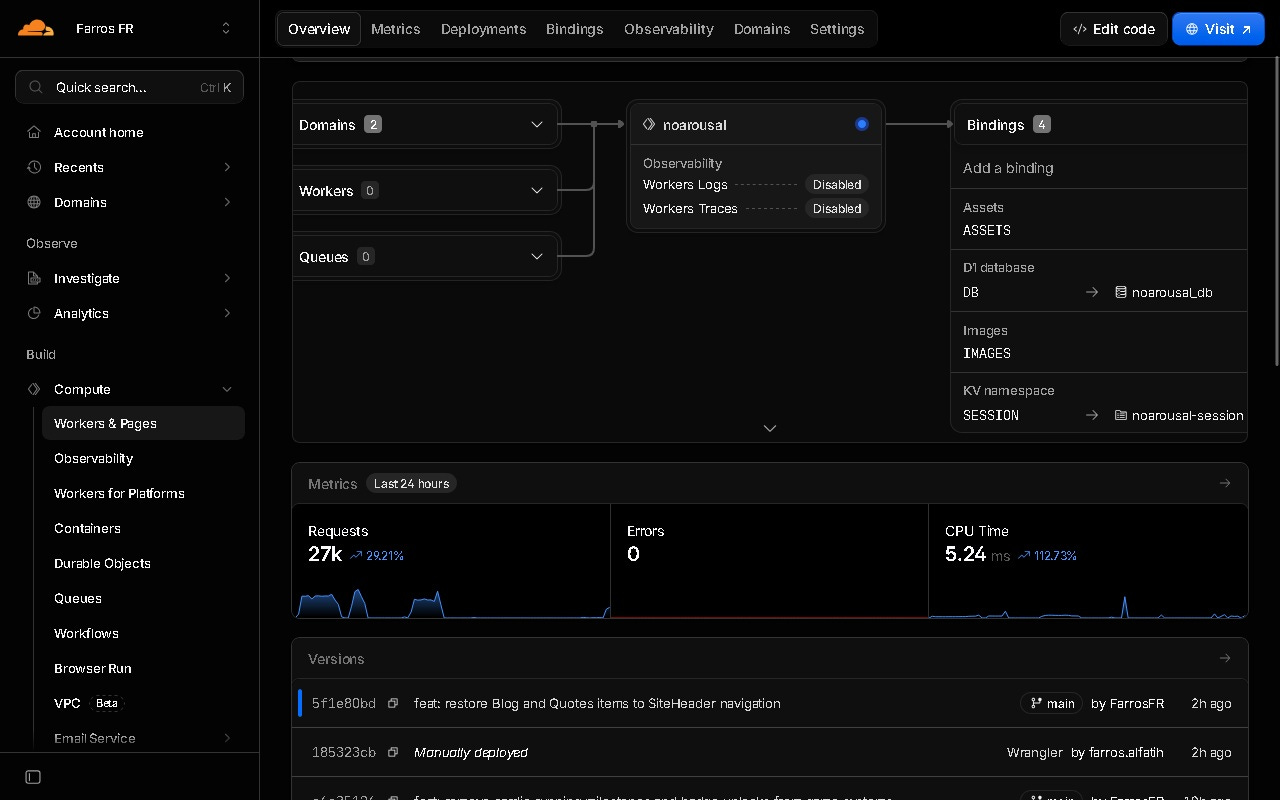
Figure 3: A real production dashboard. 27K requests in 24 hours, 0 errors, bindings for D1, KV, Assets, and Images.
The Architecture
The key insight from my experience: not everything needs to be server-rendered. By using Astro's hybrid rendering mode, you can prerender static pages at build time and only use SSR for pages that genuinely need real-time data. This dramatically reduces your D1 reads and keeps you well within free tier limits.
┌─────────────────────────────────────────────────┐
│                  Cloudflare Edge                │
│                                                 │
│  ┌──────────┐   ┌──────────┐   ┌─────────────┐  │
│  │  Assets  │   │  Worker  │   │     KV      │  │
│  │ (Static) │   │  (SSR)   │◄──│  (Sessions) │  │
│  └────┬─────┘   └────┬─────┘   └─────────────┘  │
│       │              │                          │
│       │              ▼                          │
│       │         ┌──────────┐                    │
│       │         │    D1    │                    │
│       │         │   (SQL)  │                    │
│       │         └──────────┘                    │
│       ▼                                         │
│   Static Pages    Dynamic Pages                 │
│   (prerendered)   (server-rendered)             │
└─────────────────────────────────────────────────┘
Static pages (homepage, about, blog posts) are prerendered at build time and served directly from the Assets binding. No Worker invocation, no D1 reads.
Dynamic pages (dashboard, user settings, API routes) are server-rendered by the Worker, which queries D1 for data and KV for session management.
Edge Routing with _routes.json
When you build an Astro hybrid application, the @astrojs/cloudflare adapter automatically generates a _routes.json file in the build output (dist/). This file is a configuration manifest for Cloudflare's edge router, defining:
Include rules: Wildcard patterns for routes that must invoke the Worker (e.g.,
/bookmarks,/api/*).Exclude rules: Patterns for routes that should bypass the Worker completely and serve static assets directly from Cloudflare's CDN storage (e.g.,
/about,/_astro/*,/favicon.svg).
A typical automatically generated _routes.json looks like this:
{
  "version": 1,
  "include": [
    "/bookmarks",
    "/api/*"
  ],
  "exclude": [
    "/about",
    "/_astro/*",
    "/favicon.svg"
  ]
}
Because this routing happens at Cloudflare's CDN layer before reaching the Worker:
0ms Worker CPU Time: Static pages cost zero Worker compute, leaving the full 10ms CPU limit for dynamic endpoints.
0 Worker requests count: Excluded routes do not count toward your daily 100,000 Workers request quota.
Serverless SQL Without Connection Pooling
In a traditional cloud setup (such as AWS Lambda or traditional VMs), scaling serverless functions requires connecting to a relational database like PostgreSQL or MySQL. This introduces two major performance bottlenecks:
TCP Handshake Latency: Creating new database connections is slow and expensive.
Connection Exhaustion: High concurrent traffic can crash the database by exhausting available connections, requiring complex external poolers (like PgBouncer).
Cloudflare D1 is different. It is a serverless SQL database built on SQLite that runs directly inside Cloudflare's V8 isolate environment. Because the database bindings are native, there is zero TCP connection overhead and zero pool limit constraints. When your Worker runs a query, it accesses D1 instantly without a database cold start.
Step 1: Initialize the Project
Start by creating a new Astro project with the Cloudflare adapter:
npm create astro@latest ./my-app -- --template minimal --yes
cd my-app
npx astro add cloudflare --yes
This sets up Astro with the @astrojs/cloudflare adapter, which compiles your app into a Cloudflare Worker.
Step 2: Create the D1 Database
Use Wrangler (Cloudflare's CLI) to create a D1 database:
npx wrangler d1 create my-app-db
This outputs a database ID. Add it to your wrangler.toml (create this file in your project root):
name = "my-app"
compatibility_date = "2026-07-01"

[assets]
directory = "./dist"

[[d1_databases]]
binding = "DB"
database_name = "my-app-db"
database_id = "your-database-id-here"
Now create your schema. Create a file called schema.sql:
CREATE TABLE IF NOT EXISTS bookmarks (
  id INTEGER PRIMARY KEY AUTOINCREMENT,
  url TEXT NOT NULL,
  title TEXT NOT NULL,
  created_at DATETIME DEFAULT CURRENT_TIMESTAMP
);
Apply it:
npx wrangler d1 execute my-app-db --file=./schema.sql
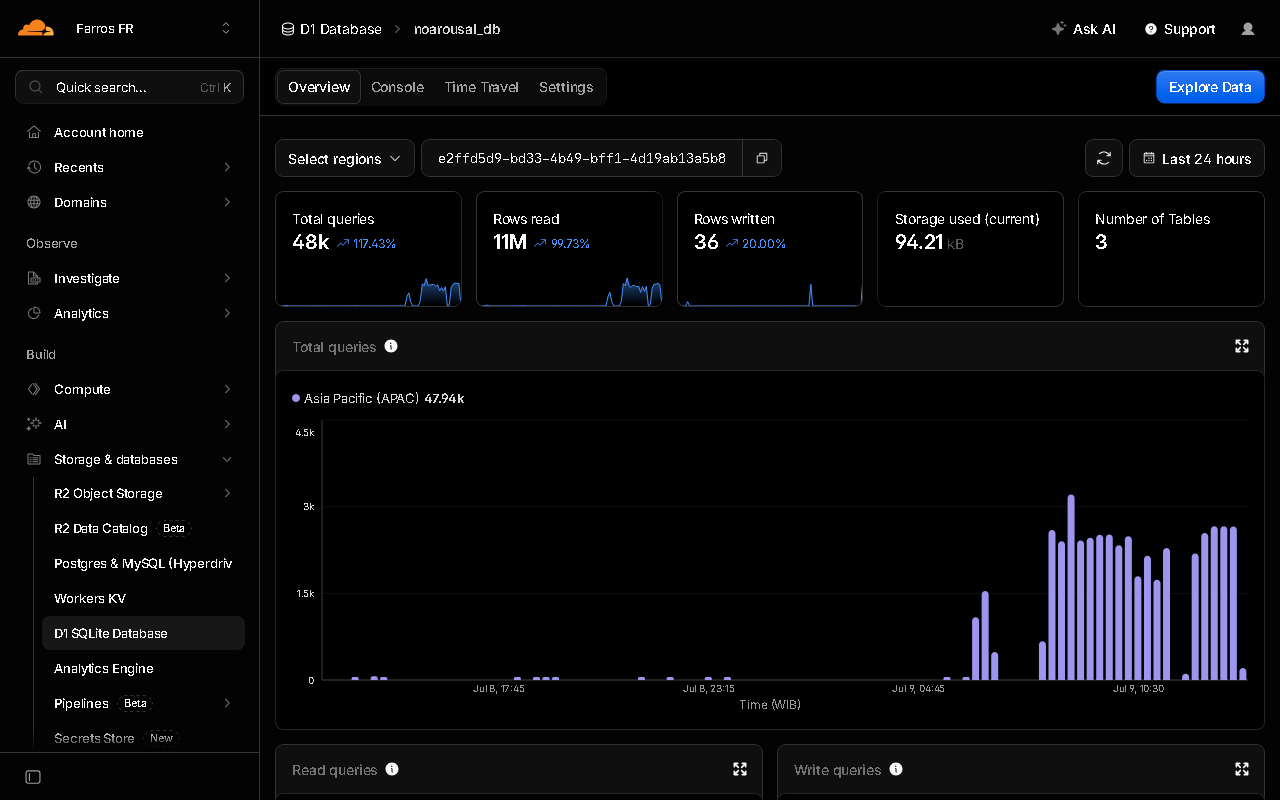
Figure 4: Cloudflare D1 dashboard displaying total queries, row metrics (reads and writes), and current storage usage.
Managing D1 with a GUI
If you are used to desktop database managers like PGAdmin (for Postgres), Laragon/phpMyAdmin (for MySQL), or DBGate, you don't have to manage D1 solely via the command line. You can explore and edit your database using graphical interfaces:
1. Remote Database: Cloudflare Dashboard Console
For your deployed production database, Cloudflare provides a built-in web console and data explorer:
Log in to your Cloudflare Dashboard.
Navigate to Workers & Pages > D1 and select your database (
my-app-db).Click the Console tab to run SQL queries directly in your browser.
Click the Tables tab to browse schemas, view rows, and edit table values visually without writing SQL.
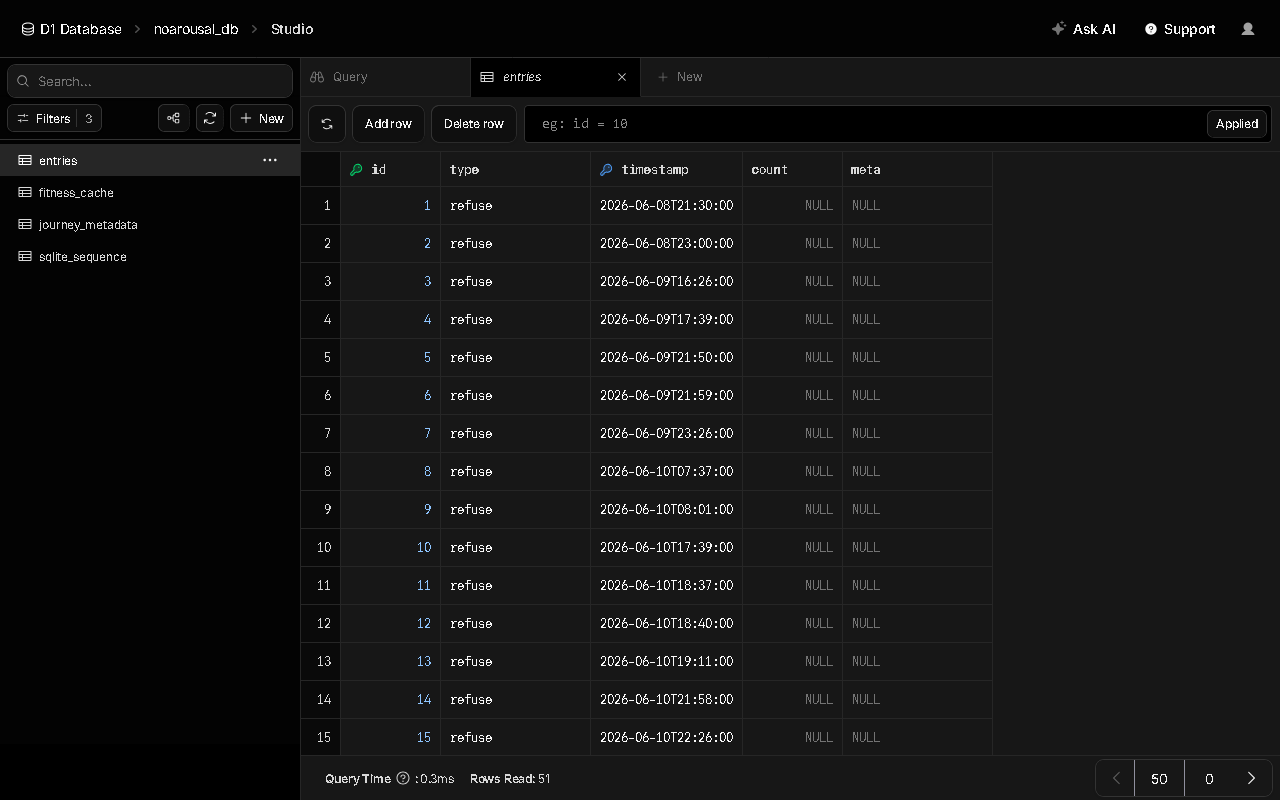
Figure 5: Cloudflare D1 Studio interface displaying visual table columns, rows, and datatypes.
2. Local Database: Standard SQLite Clients (TablePlus, DBeaver, DB Browser)
When developing locally using Wrangler's local dev server, your database state is stored as a standard SQLite file inside your project directory at: .wrangler/state/v3/d1/miniflare-D1DatabaseObject/
You can open this .sqlite file directly in any desktop SQLite client (such as TablePlus, DBeaver, DB Browser for SQLite, or the VS Code SQLite Viewer extension) to manage tables, run queries, and edit mock data locally.
Step 3: Set Up KV for Sessions
Create a KV namespace for session storage:
npx wrangler kv namespace create SESSION
Add the output to your wrangler.toml:
[[kv_namespaces]]
binding = "SESSION"
id = "your-kv-namespace-id-here"
KV is ideal for sessions because reads are extremely fast (edge-cached globally) and sessions are typically small key-value pairs. With 100K free reads/day, you can handle thousands of authenticated users.
Step 4: Configure Astro for Hybrid Rendering
Update your astro.config.mjs to enable hybrid rendering:
import { defineConfig } from 'astro/config';
import cloudflare from '@astrojs/cloudflare';

export default defineConfig({
  output: 'hybrid',
  adapter: cloudflare({
    platformProxy: { enabled: true },
  }),
});
With output: 'hybrid', pages are prerendered by default. Only pages that explicitly opt in to SSR will run on the Worker. This is how you keep your D1 reads low.
Step 5: Build a Dynamic Page
Create a server-rendered page that queries D1. Create src/pages/bookmarks.astro:
---
export const prerender = false;

const runtime = Astro.locals.runtime;
const db = runtime.env.DB;

const { results } = await db
  .prepare('SELECT * FROM bookmarks ORDER BY created_at DESC')
  .all();
---

<html>
  <body>
    <h1>My Bookmarks</h1>
    <ul>
      {results.map((b) => (
        <li>
          <a href={b.url}>{b.title}</a>
          <small>{b.created_at}</small>
        </li>
      ))}
    </ul>
  </body>
</html>
The key line is export const prerender = false. This tells Astro to server-render this page instead of prerendering it.
Step 6: Add an API Route
Create src/pages/api/bookmarks.ts to handle form submissions:
export const prerender = false;

import type { APIRoute } from 'astro';

export const POST: APIRoute = async ({ request, locals }) => {
  const db = locals.runtime.env.DB;
  const form = await request.formData();
  const url = form.get('url')?.toString();
  const title = form.get('title')?.toString();

  if (!url || !title) {
    return new Response('Missing fields', { status: 400 });
  }

  await db
    .prepare('INSERT INTO bookmarks (url, title) VALUES (?, ?)')
    .bind(url, title)
    .run();

  return Response.redirect(new URL('/bookmarks', request.url), 303);
};
Step 7: Deploy
Deploy your app to Cloudflare:
npx astro build
npx wrangler deploy
That's it. Your full-stack app is live on Cloudflare's global edge network.
Optimization: Staying Within Free Tier Limits
Here's the strategy I use to keep my app comfortably within the free tier:
1. Prerender Everything You Can
Any page that doesn't need real-time data should be prerendered. Homepage, about page, blog posts, documentation, all static. This means zero D1 reads for the majority of your traffic.
2. Use Indexes on D1
D1 counts every row scanned, not just rows returned. A full table scan on a 5,000-row table counts as 5,000 reads even if you only return 1 row. Always add indexes on columns you filter or sort by:
CREATE INDEX idx_bookmarks_created
  ON bookmarks(created_at DESC);
3. Use KV as a Cache Layer
For frequently-read but rarely-changed data, cache D1 results in KV:
const cacheKey = 'bookmarks:latest';
let cached = await env.SESSION.get(cacheKey, 'json');

if (!cached) {
  const { results } = await env.DB
    .prepare('SELECT * FROM bookmarks ORDER BY created_at DESC LIMIT 20')
    .all();
  await env.SESSION.put(cacheKey, JSON.stringify(results), {
    expirationTtl: 300,
  });
  cached = results;
}
This pattern converts D1 reads into KV reads, which have a much higher free tier limit (100K vs 5M, but KV reads are faster and reduce database load).
4. Use Astro's Built-in Static Pages
For your landing page and marketing content, keep prerender = true (the default in hybrid mode). These pages are served directly from the Assets binding with zero Worker invocations.
Final Thoughts
Cloudflare's free tier is genuinely one of the best offerings for indie developers right now. The combination of D1 (SQL database), KV (fast caching), Workers (edge compute), and Assets (static hosting) gives you a complete full-stack platform without spending a cent.
The trick is architecture: use Astro's hybrid rendering to keep static pages static, index your D1 tables properly, and cache aggressively with KV. Do this right, and you can serve tens of thousands of requests per day, completely free.
Thanks for reading. See you in the next lab.